Microsoft Silverlight is the new product they introduced for rich interactive web application developments. In previous topics I introduced how you can use Ajax technologies for rich web application development. We use Ajax technologies to introduce JavaScript and call server calls through JavaScript to minimize page refresh. With this method we can save lot of page refreshes but we might face some difficulties in developing Ajax enable applications when we go for complex applications. Silverlight is a powerful development platform for creating engaging, interactive user experiences for Web, desktop, and mobile applications when online or offline. With Silverlight you can build web or mobile applications very similar to desktop application developments. You know that we have much more freedom with desktop application to use complex controls. But with web application we have some limitations due to the technologies use, bandwidth, security issues...etc. The objective of Silverlight is like run desktop like application on the web or mobile browser. But this doen't mean that Silverlight is for web or mobile application developments. You can use Silverlight for desktop applications, but here I will more concentrate on how to develop rich interactive web or mobile applications using Silverlight.
Download Silverlight Click Here
Silverlight uses two components, where Silverlight runtime for web browser to run your Silverlight application on the web browser and Silverlight development environment plug-in for Microsoft Visual Studio. To browse or run Silverlight application you only need Silverlight runtime. If you developing web application using Silverlight technologies you need to install Silverligth plug-in for Visual Studio.
Silverlight Showcase is online collection of live sample applications developed using Silverlight. This is a good collection for beginner to understand what are the capabilities of Silverlight.
Let's moving to simple Silverlight project and understand the features of Silverlight. First you need to download Silverlight development plug-in for Visual Studio. Download Once you successfully installed Silverlight into your Visual Studio Development Environment, it will show you two more project types called Silverlight Script Web and WCF Service.
Fig 1: Silverlight projects
Here we select Silverlight Script Web project type, give project name and click ok button. Now you well have new Silverlight project opened. In the solution explorer you can see that few new pages have been created. Default.html and Silverlight.js are the most important pages. Default.html file is the default page when you run your Silverlight application. Silverlight.js is the code behind JavaScript file. You can run this application and see.
Fig 2: Silverlight project solution explorer
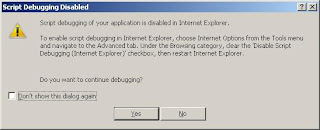
Once you debug your application if you get "Script Debugging Disabled" error message you need to go to your default web browser and enable Script Debugging feature.
Fig 3: Script Debugging Disabled Message
Once you run your project you will get simple web page with "Click Me" button. Once you click on the button you will get small pop-up message. You can see that this button is JavaScript button, not web control and it doesn't take page refresh.
Fig 4: Sample Silverlight Project
This is the empty sample project. But what we need to develop our own application. Let's see how we can achieve this. So far in your solution you have only Silverlight web project. Now we need to add Silverlight Application to your solution. Right click on the solution and select new project and add "Silverlight Application" project.
Fig 5: Add Silverlight Application Project
Now you have two projects in your solution. Also you can see that additional pages have been added to your previous Silverlight web project automatically. In my example SilverlightTest is the web project and SilverlightApplication is the application project. In previous in your web project had only Default.html page, but now you have SilverlightApplicationTestPage.html page as well. This page has reference from web project page to application project page. Now you can develop your application in SilverlightApplication project and refer them in web project to run on web browser.
Fig 6: SilverlightApplication Project in Solution Explorer
Now let's look at on SilverlightApplicatio project. There you can see MainPage.xaml file. This is the template file for your SilverlightApplicationTestPage.html file. Now you can add Silverlight controls to MainPage.xaml to build your first page. Now open MainPage.xaml page. In Toolbox window you can see that new collection of Silverlight XAML Controls.
Fig 7: Silverlight XAML Controls
Any control in the Toolbox you can drag and drop into your MainPage.xaml page and build your Silverlight page. Here difference than now ASP.NET web page development is, you have define the page template; Not actual page. I am going to add a button to your MainPage.xaml page and write some code for that button call. Open MainPage.xaml page and drag and drop "Button" control from Silverlight XAML Controls. Now you can see the XML tags for empty button. You have to define that button as you like. I have given a name, height, width, click event and content to display for this button. Name is "testButton", height: 100, width:200, button click event name is "Button_Click" and content display on the button is "This is test button". Also you can see that Grid control already been added automatically called "LayoutRoot".
Fig 8: Silverlight MainPage.XAML page source
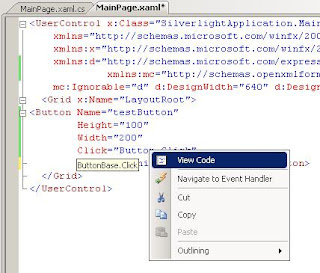
Now our first Silverlight page done. Next step to write some code for this button call. Right click on the MainPage.xaml page and select "View Code" option and go to code behind.
Fig 9: Silverlight Button Event Handler Code
If will open new page called MainPage.xaml.cs file. If is more like normal ASP.NET page, but it is not. What I am going to do here is once click on the button, it will show the current time without refreshing web page. For that I will add another label for your MainPage.xaml as previous. Then go to Button_Click event and write our server code.
Fig 10: MainPage.xaml.cs File
private void Button_Click(object sender, RoutedEventArgs e)
{
this.myLabel.Content = System.DateTime.Now;
}
Now this is the important thing. You wrote server code or C# code for your web button. That button is call a JavaScript and that JavaScript call your server code. So that once you click on this button it goes to server to accomplish your task but it doesn't not refresh your page. Run this project at see how your button work.
Fig 11: Show Time Silverlight Application
Click several time on the button ans see current time changes, but it doesn't not refresh the page.
Important things to learn here is how simply you can build such rich interactive web application with Silverlight. Here is very simple example, you can try lot more complex project using Silverlight. Will meet again with some other projects. If you have any problem please post them on comment section and I will attend to them.
Read More:
CodeProject


Well explained
ReplyDeletehi, great tech article! please visit my tech blog and tell me what you think at cavitchtech.blogspot.ca
ReplyDeletethanks!
thanks for the stuff.
ReplyDelete